Policies
Recent Articles
- Infinite Flight Partners with Sporty’s Pilot Shop
- Welcome to Flight Simulation Webinar – comparing Microsoft, X-Plane, and Infinite Flight
- MSFS and X-Plane 12 Jumpstart Class with Flight Sim Coach
- Stop gaming and start learning
- How to install Sporty’s Honeycomb Bravo Profiles with X-Plane 12 (Version 2)

Comparing Microsoft Flight Simulator and X-Plane (part 1)
/in Product Reviews/by Chris McGonegleThe purpose of this three part blog is to grade Microsoft Flight Simulator versus X-Plane on a wide range of features. Each program has its strengths as well as its weaknesses and it’s worth researching those before financially committing to a software trainer. Edition one of this blog will focus on the differences you need to know before buying either program. Read edition two here.

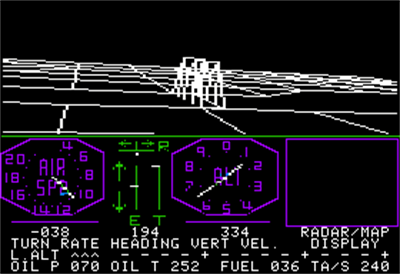
When the first flight simulator program was released in 1979 by subLogic, it required a deep understanding of aviation in order to really enjoy it. There were no online videos to assist in setup and it was four colors relaying graphical terrain, airspeed, altitude, a couple secondary control indicators, and a handful of aircraft instrument indications. It was only 10 years after we first set foot on the moon, but compared to today’s software and computing power, this was an abacus.
Fast forward to today’s flight simulation consumer market and the options aren’t even in the same league as the 1979 offering. Today’s programs use Bing maps to relay an accurate portrayal of planet Earth, regardless of where and when you’re flying. Factor in customizable weather, live traffic, and electronic flight bag integration and you have simulator scenarios that couldn’t have been dreamt of 40 years ago. But which program to use? Let’s compare X-Plane 11 and Microsoft Flight Simulator 2020.
The very first item worth considering when starting down the flight simulation journey is what type of computer will be used to run the simulator. If you have a run of the mill desktop PC that’s 3-5 years old, you’re most likely better suited to run X-Plane 11 rather than Microsoft Flight Simulator 2020. That’s because X-Plane 11 requires less computing power than Microsoft’s program due to less of a focus on outside the airplane features. Plus, it’s a more seasoned and therefore streamlined program.
In the below image you can see the recommended specifications for each program. To avoid going down the rabbit hole of explaining what each specification means, it’s safe to say that the larger the number in the column, the more computing power or financial commitment the program requires. Microsoft’s program requires a PC—or specifically a gaming PC—designed or manufactured within the previous two years. Other than that, you’re most likely looking at X-Plane 11.
Another plus for X-Plane is that it will run on a Mac, whereas Microsoft decided they will only allow the program to run on Windows 10 or 11. Lastly, it’s worth mentioning that with X-Plane 11 you can fly before you buy—literally. The X-Plane program allows you to try a free demo to better acquaint yourself with the layout, design, and user interface of the program before committing monetarily.
Next we can focus on the support that both software programs offer to the community. Regrettably, this is an area that a lot of users feel could be improved because it’s next to impossible to speak to a live person if you run into an installation issue or a question regarding simulator settings. The Microsoft team offers a very detailed and organized FAQ forum that more often than not will have the answer you’re looking for. I can say that if you pass through enough hoops and still haven’t found your answer you will have the ability to set a Microsoft Teams appointment with a representative who can help you with elementary issues, but that’s the extent of help available on the web.
With X-Plane we have a similar support page provided by the X-Plane team that can help with simpler questions, but we also have a community created site that covers multitudes of questions, and then some. I attribute the design of this page to the fact that X-Plane customers are very loyal to the continuously evolving program, and the fact that X-Plane 11 is almost five years old. It’s had ample time to address early stage bug fixes, given the simulation community a stable baseline of what to expect, and really created a reliable program—leading to a forums page with conversations that don’t become outdated after an update or two. The last feature of X-Plane.org that’s worth highlighting is the expansive digital store. With over 1,400 aircraft and 12,000 sceneries, X-Plane is my leading answer when a customers asks where they can find their own aircraft in digital form or a detailed home airport.
The final aspect we’ll grade these programs on is how well each program plays with other hardware or software components. Unless you’re a seasoned simmer with a couple dozen digital hours in your logbook, it can get overwhelming having to configure flight simulator hardware for what you would like to happen in the simulator. For that reason, both programs preemptively made sure that 95% of available hardware on the market would be plug-and-play compatible. The glaring difference between the two is the amount of detail and button configuration occurring as soon as you plug the hardware in.
For hardware options that are clear cut in what the majority of the controls need to do (yoke commanding pitch and roll, rudder pedals conveying rudder movement) X-Plane does a great job of taking care of the basics. But on the highly complex items, such as the Honeycomb Bravo, there are no preset control inputs. I see this as both a blessing and a curse: it’s a curse because we will have to manually go in and designate lever one to throttle one, lever two to throttle two, lever three to propeller control one, etc. It will be a little time consuming, but at the same time we will know what each knob, lever, or button does. The Honeycomb Bravo has 51 control inputs it can relay to the simulator program, so knowing or customizing what each one does is the well-earned blessing. Pro Tip: Make sure you designate one to the parking brake toggle.
Microsoft Flight Simulator took the alternate approach and made sure that the time between plugging new hardware into the program and getting digitally airborne is a minimum. As evident with the screen grab below, when the Bravo Throttle Quadrant is set to the default profile, you’ll have Radio, Instruments and Systems, Flight Control Surfaces, Lights, Autopilot, Power Management (featuring two throttles, two propeller controls, and two mixture controls), and Landing Gear already configured. This makes it extremely helpful if you’re wanting to get airborne as fast as possible—just don’t expect to know what all the buttons will do the first time you fire up the program.
One additional aspect worth mentioning before moving away from button control management is duplicate commands. When a simulator piece like the Honeycomb Bravo is plugged into a computer, some of the switches could be set in a certain position that precludes the activation of that command from other hardware pieces. Here’s a scenario: one of the seven toggle switches on the Bravo is set to “Engage parking brake” without our knowledge, or we forgot we made that command designation. Fast forward to a flight where we’ve designated a button on our yoke as the “Toggle parking brake” command, and as we push that command, we notice nothing is happening. This situation is a sort of zombie command loop that confuses more customers and simulation enthusiasts than you would think. Even though we’ve given a command to toggle our parking brake, we have a set switch in the active position that is continuously giving the command “Engage parking brake.” The best way to avoid this issue (which exponentially increases as you add more and more hardware pieces to your flight simulator setup) is to start with a fresh canvas and configure your hardware to your style of flying.
Both of these simulators are great options for anyone looking to take to the digital skies and enjoy the fruits of today’s powerful computers. When analyzing the pre-purchase strengths of these two programs, it’s worth designating what you want to gain from your at-home simulator. If higher end computer performance is attainable and you want to spend more time looking outside the airplane than inside, Microsoft Flight Simulator gains a point. If you may be subject to a stricter budget or you want to get granular with your plane’s control responses or fly a specific aircraft, X-Plane is your front runner.
__
The purpose of this three part blog is to grade Microsoft Flight Simulator program versus X-Plane on a wide range of features. The next edition will cover your first five minutes in both programs, weight and balance, failures, live features, and designing a flight plan.
Learn more:
Logitech Flight Simulator Joystick—Product PIREP
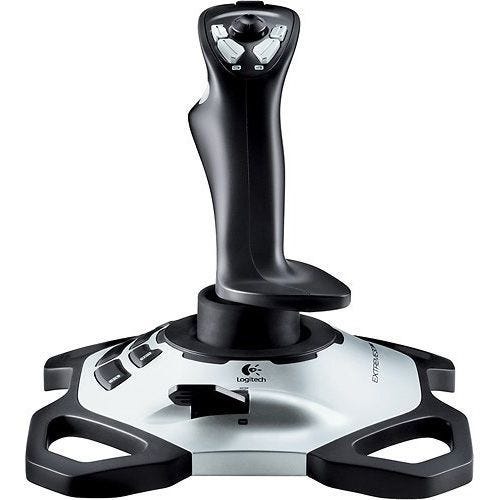
/in Product Reviews/by Chris MichelOne of the most popular flight simulator hardware controls we sell at Sporty’s Pilot Shop is the Flight Sim Joystick from Logitech. This is one of the most tenured hardware pieces in the Logitech brand of flight simulation options, which may be a contributing factor, but I believe it’s more because of the value this stick brings. Not only does this flight stick offer control of the four axes needed to fly, you won’t be able to find a lower priced flight stick (currently serviced) on the market.

In today’s flight simulator environment, featuring terabytes of data forming the global landscape and algorithms calculating wind speeds and their effect on an airplane’s position and angle of attack, it would be borderline negligence to try and pilot a digital airplane with a default keyboard and mouse. The airplane’s controls that I would classify as NEEDED in order to pilot a plane would be roll, pitch, yaw, and throttle control. Roll and pitch are obvious contenders to keep an airplane doing what it should. Yaw can be discounted if you don’t care about coordinated flight, but it’s also extremely difficult to taxi the airplane on the ground, hold centerline on takeoff, or land with any crosswind component over 3 knots.
Who wants an airplane with a dead throttle? Yes, you could configure a mouse wheel to take care of the throttle feature but it’s more realistic to have a lever that allows you to control the throttle, whether firewalled on takeoff or critiquing those small changes when changing a descent profile. Keep in mind this lever can also be configured for mixture or propeller setting if desired.
The hat switch on top of the throttle offers the ease of transitioning to new viewpoints or angles inside and outside the airplane. Much easier to look over the left shoulder and confirm it’s time to turn from downwind to base with the hat switch. The additional four buttons on top of the stick and six on the base of the throttle offer ample opportunities to customize this system for any digital mission. If you aren’t in the mood to devote time to configuring or customizing the flight sim stick to your preferences, it is compatible out of the box with the new Microsoft Flight Simulator 2020 and X-Plane 11 with the pertinent commands (pitch, roll, yaw, throttle, flaps, and elevator trim) pre-configured to allow instant enjoyment.
In the world of digital flight, where every detail of the environment can be edited to your preference, the number of settings can sometimes become intimidating. The Logitech Flight Sim Joystick, on the other hand, won’t contribute to your digital preflight workload and is—in our conclusion—one of the best value hardware pieces. It’s tailored towards a seasoned simmer needing a control input with a small footprint, but on the opposite end of the spectrum it’s able to assist someone wanting to enter the flight sim world with a limited budget. We’re sure you’ll appreciate the ability of the flight sim stick, just as we do here in the Flight Simulation department of Sporty’s Pilot Shop.
Flight simulator hardware maps for Logitech, CH Products, Redbird
/in Tips and technique/by Chris McGonegleIf you’re upgrading your flight simulator controls to take advantage of the new Microsoft Flight Simulator, you’ll first need to configure a few things in the Options menu (click on Controls). This requires selecting which control inputs creates which effects, and assigning important functions to some buttons—often called a hardware map. This article explains how to get off to a fast start with the popular hardware options, including Logitech, CH Products, and Redbird.
Some controls (like the Logitech G series) are instantly recognized by Microsoft Flight Simulator. Some others require manual setup. The first thing you’ll want to do is assign different buttons and levers to different controls. For example, to let the software know that turning the CH Products Yoke left should control the ailerons, set Left Axis X to roll. See below for complete hardware maps.
Logitech G – Saitek Yoke
Shop Logitech G – Saitek Yoke
Logitech G – Saitek Throttle Quadrant
Shop Logitech G – Saitek Throttle Quadrant
Logitech X52 Flight Stick and Throttle
Shop Logitech X52 Flight Stick and Throttle
Shop Thrustmaster HOTAS One
CH Products Eclipse Yoke
Shop CH Products Eclipse Yoke and Throttle
CH Products Yoke and Throttle
Watch this video for more details
Shop CH Products Yoke and Throttle
CH Products Rudder Pedals
Watch this video for more details
Shop CH Products Rudder Pedals
CH Products Fighterstick
Watch this video for more details
Shop CH Products Fighterstick
CH Products Pro Throttle
Watch this video for more details
Shop CH Products Pro Throttle
Redbird Alloy Yoke
Watch this video for more details
Shop Redbird Alloy Yoke
Redbird Alloy Throttle (single engine)
Shop Redbird Alloy Throttle
Redbird RD1 Rudder Pedals
Shop Redbird RD1 Rudder Pedals
NFS Cirrus Flight Simulator Yoke
Watch this video for more details
Shop NFS Cirrus Flight Simulator Yoke
Flight sim’s early days and cross-country flying, with Bruce Williams – Pilot’s Discretion (ep. 30)
/in Software Videos/by John ZimmermanListen to all podcast episodes: https://www.sportys.com/podcast
Bruce Williams had a front row seat to some exciting developments in flight simulators, working at Microsoft as their program grew from a simple DOS program to a visually stunning virtual world. He offers some practical tips for using a sim for home training (have a plan, don’t stress about the controls) and weighs in on the “game vs. simulator” debate. Bruce is also a longtime flight instructor, so he shares his tips for flying long cross-country flights, how to master glass cockpits, and learning aerobatics. In the ready to copy segment, Bruce tells us his favorite preflight weather tools, why pilots should use the autopilot more, and his favorite author.
Honeycomb Bravo configuration for X-Plane 11
/in Tips and technique/by Chris McGonegleThe Honeycomb Bravo throttle is an amazingly capable hardware piece that, once configured correctly, leads the pack in flight sim throttle options. Offering six customizable levers, each with designated detents, plus a tension dial is appealing in itself. For even more training value, it also includes a trim wheel, gear lever with indicator lights, an annunciator panel with seven two-way switches, a flaps lever, and lastly, subtle yet dynamic autopilot controls. It’s easy to argue that the Honeycomb Bravo is one of the most powerful add-ons available for today’s digital pilots.
The downside of all these options is that it can be intimidating to program all the commands and levers to operate as we would like. For that reason, the flight simulation department at Sporty’s put together a configuration map for running the Honeycomb Bravo with X-Plane 11. We cover how to configure the throttle for single engine GA, single engine GA complex, multi-engine GA, two-engine jet, and four-engine jet aircraft. It is advised to confirm that the Honeycomb Bravo is configured with levers in the indicated positions for each setting to avoid faulty command settings.
X-Plane Default Settings
X-Plane GA Settings
X-Plane Jet Engine Settings
How to change weather settings in Microsoft Flight Simulator
/in Software Videos/by Chris McGonegleEditing the weather settings within Microsoft Flight Simulator is easier than most know. While flying the digital aircraft, we can change wind speeds, cloud heights, even the barometric settings. Set the cloud ceilings for your favorite IFR approach 20 feet above the minimums and enjoy the challenge!
Shop flight sim >>